Monday 27 September 2010

Decorating on a Budget

If you are going to have a gorgeous room on a budget and you are going to decorate and design it yourself! Think there is no way that's going to happen? All that's standing between you and that gorgeous room is some simple decorating and design basics. When you understand those, you can decorate any room. We actually know more about design than we realise. Have you walked into a room that just "feels" off? Violation of one of these principles just may be the reason. Learning more about design may enable you to figure out what was wrong and make certain you don’t make the same mistake in your home.

The Basics of Colour

Colour can make a room a success or - if totally wrong - can make it a disaster. But the best thing is - it's easily changed and inexpensive. The paint you chose can lighten a room or make it dark and intimate, can be a personal statement or a classic tradition, and can be a neutral palette or a focal point. Just decide which direction you want to go and use the colour principles here to design with a colour.

Using Colour Charts

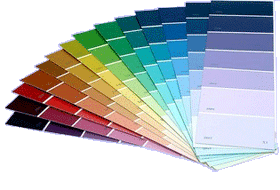
The colour Chart or swatch is a great tool for home decorating. All colour schemes used in design are based on this. Knowing how to use these and pick colours which harmonise and compliment will help you find a colour scheme that can create a eye-pleasing design to enhance your home.


 Your local paint store or DIY store can give you sample colour charts. Find colour combinations, and paint colour formulas that you can take home and plan and experiment with.


Go Green!
Down to earth from Harris Brushes is a inexpensive range of decorating products specially designed to be environmentally friendly. The components of the range are manufactured using either sustainable sources or recycled materials and have been produced to ensure that all parts are biodegradable or recyclable. Simply use and throw away!


More than 35 million paintbrushes are discarded into toxic landfills every year, in the UK alone. This includes over 24 tonnes of Polypropylene, which with no additives is non-biodegradable, toxic to the environment whilst eroding and can take up to 450 years to degrade (dependent on landfill conditions). Whilst Polypropylene has a number of good uses, its key strengths of durability and resistance to fatigue are its enemy when it comes to biodegrading or recycling.


Understanding Room Design


So what are you going to do with that bare room? To figure that out, you need to understand the size of your space, the problems it has, the relationship between one element and another in the space and how the eye perceives those relationships. Understanding these elements are essential when planning your space layout and the placement of the furniture and accessories.


Once you understand how colour and space relationships work, you are ready to put your room together. Fabrics, furniture, and accessories can now be added. You probably have a style in mind that you prefer, so go for it. One last piece of advice: less is more. Only put into the room half of what you think you want. The design will be cleaner, less cluttered and elegant. It will be that gorgeous room that you finally designed yourself!


    Friday 24 September 2010

    Diy Disasters

    The Home & Garden Survey was carried out in November and December 2009 by Homebase and surveyed a total of 208,257people.  As the nation gears up for a bank holiday weekend and paintbrushes, drills, hammers and pasting tables are dusted off, Homebase has revealed the causes of the most common DIY disasters following the biggest home and garden survey ever conducted in the UK.


    Homebase, asked more than 200,000 people about their DIY experiences and were inundated with tales of hammer horrors, painting panic and far-from-fool-proof-flooring. The DIY disaster league shows that the number one project likely to cause a calamity is painting and decorating, followed by flooring, hammering nails, drilling and plumbing.
    Men are most likely to find themselves in a spot of bother when hammering nails, while for women it’s decorating. One in ten women have had a disaster doing the painting and decorating while 15% of females claimed their biggest disaster when it comes to DIY is their husband! With more than 1,000 of those surveyed claiming to have sustained an injury as a result of a DIY disaster.
    Despite a few problems along the way the vast majority of people are still keen to have a go at Doing-It-Themselves with only 10% of respondents saying they rely on the experts for the whole job and 80% of people saying they get pleasure from improving their home doing DIY.


    Paint Pot

    The Homebase DIY disaster league:
    1. Painting and decorating
    2. Flooring
    3. Hammering nails
    4. Drilling
    5. Plumbing
    Examples of DIY disasters shared with Homebase in the survey:
    • Drilling holes through brand new central heating pipes 20 minutes before the carpet fitters were due to arrive
    • Cutting an overgrown garden with a strimmer and hitting a stone resulting in a smashed conservatory window
    • Hanging floral wallpaper upside down, with the pattern not matching
    • Hammering a new shelf resulting in a flat screen TV being knocked off the other side of the wall and falling to pieces on the floor


    Simon Yeomans, DIY category marketing manger at Homebase commented, “Easter weekend is always one of the busiest of the year for DIY with plenty of time to tackle important projects around the home. People are more likely to try something ambitious and our advice is to make sure you prepare well. Homebase has a series of ‘How To’ guides available in store and online for all the most popular projects with step-by-step instructions, top tips and the tools you need for the job.”

    Monday 20 September 2010

    Blistering and peeling Paint!

    Blistering and peeling are almost always caused by moisture, either moisture vapour or actual moisture, usually water.
    During the winter months, excess moisture building up inside the house escapes through walls and into exterior paint. When the summer sun heats the siding, water trapped inside the paint film is vaporized with the resulting pressure causing the topcoat to blister.
    But how do you prevent this?
    To fix the blistered spots in the paint on your house, you will need to scrape the blisters off. If the bare spots are very noticeable, you will need to sand them down flush with a fine grade of sandpaper. You will then need to use a good - quality primer to undercoat the bare areas. Follow the manufacturer's directions on the container in order to achieve the best results. However, it would be a good idea to let the primer dry thoroughly for a day or two. Then, follow that with a couple coats of good, quality paint.